Easily install pre-built Shopify section templates without hiring a developer!
Shopify Insights
A Step-by-Step Tutorial on Using Shopify Metafields

Shopify Metafields is a valuable feature that allows merchants to extend the functionality of their online stores by adding custom fields and storing additional data beyond the standard fields provided by Shopify.
In this tutorial, we will walk you through the process of using Shopify Metafields effectively, enabling you to enhance your product information, streamline data management, and create a tailored shopping experience for your customers.
Step 1: Understanding Metafields in Shopify
Before diving into the implementation, it's important to understand what Metafields are and how they can benefit your online store. Metafields are custom fields that allow you to store and manage additional data related to various entities in your store, such as products, collections, customers, orders, and the store itself. They consist of key-value pairs, where the key represents the field name or attribute, and the value holds the corresponding data. You can read more about it here.
Step 2: Plan Your Metafield Structure
To effectively use Metafields, start by planning the structure of your custom data. Consider the entities you want to associate with Metafields and the specific information you want to store. For example, you may want to add additional specifications, usage instructions, or custom attributes to your products. In another example, you may want to display specific products at the end of a blog post mentioning these products.
Step 3: Create Metafields via the Shopify Admin
Begin by defining the key names, data types, and relationships between different Metafields.
- Login to your Shopify Admin dashboard.
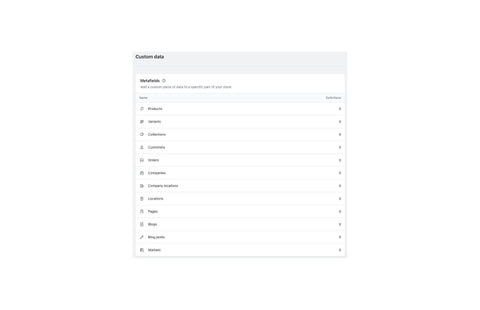
- Navigate to "Settings" and click on "Custom data".
- Click on the appropriate type of page/template that you want to add the Metafield to. For instance, if you’re adding custom data to products, click on “Products”.
- You’ll now see the list of definitions already created for that part of your store. Now, click on the green button labeled "Add definition" to start creating the new Metafield.
- Provide the required information:
- Name: Give your Metafield a name. This should be descriptive. For example, if you want to add “product weight” data, then that should be the name.
- Namespace and key: Together, the namespace and key create a unique identifier for your Metafield. They're separated by a ., and can only contain letters, numbers, underscores (_), and hyphens (-). For example, you can use the namespace “products” to group anything relevant to product info. But you can also use something like “product_data” if you are created multiple data items (i.e. “weight”, “height”, “width”, “length”). The result would be: product_data.weight, products_data.height and so on…
- Description: This is an internal description that you can add to remind you what this Metafield is for. It’s optional.
- Value Type: Choose the appropriate data type for your Metafield (i.e. Single line text, Product, File, etc.).
- Validations: Each data type includes varies values that you can add to limit the data (i.e. Min/max character count, etc.).
- Check “Storefronts” under Access to allow the store (Theme Editor and website) to be able to access this data.
- Save the Metafield.
Step 4: Associate Metafields with Entities
Once you have created Metafields definitions, you need to associate them with the relevant entities in your store.
- Navigate to the respective entity section in your Shopify Admin (e.g., "Products" for product-related Metafields).
- Scroll to the bottom of the page where you’ll find the Metafields that have been defined for use on that type of page.
- Enter the specific value for the Metafield associated with the entity.
- Save the entity.
That’s it! Your Metafield has been created and data added to the specific entity.
Lastly, you’ll need to choose where to display this data on the website itself. To do this, you go to the Theme Editor to associate the Metafield with the specific content holder.
Step 5: Add the Metafield to your Page Content
- Go to “Online Store” and then click on “Themes”
- Find the theme that you’re working on and click on “Customize”. The Theme Editor will now open.
- Navigate to the relevant page template (i.e. “Product”)
- On the left, you’ll see the list of sections that are part of this page template. Click the appropriate one, or the block that is part of this section.
- On the right, you’ll see the list of settings and content inputs. Next to most data fields, you’ll see an icon that you can click on. Click it and you’ll see the available Metafields for use.
- Choose the Metafield that you created.
- Once you’re done, you can save your changes.
You have now successfully created and added a Metafield to your website!
Step 6: Best Practices for Using Metafields
To ensure efficient usage and maintenance of Metafields, consider the following best practices:
- Use consistent naming conventions for Metafields to maintain clarity and easy retrieval.
- Regularly review and update your Metafields to align with your evolving business needs.
- Document your Metafield structure and usage for future reference and easier management.
Conclusion
Shopify Metafields provide a powerful way to extend the functionality of your online store, offering greater flexibility and customization options. By following this step-by-step tutorial, you can effectively create and manage Metafields, associate them with relevant entities, and enhance your product information, customer experience, and overall store management. Leverage the potential of Shopify Metafields to unlock new possibilities and create a unique and tailored shopping experience for your customers.