Easily install pre-built Shopify section templates without hiring a developer!
Shopify Insights
A Checklist to Help Launch Your Shopify Store


Shopify is one of the largest e-commerce platforms in the world, providing a relatively easy way to setup an online store and start selling your products. It all comes down to creating a website with an amazing web design, great products, and you will be in business in no time.
So how can you properly set up your own Shopify website? There are plenty of methods you can use, all of which are easily done and you will find the results to be quite impressive once you handle everything.
The simple process of setting up your own Shopify store
What’s great about Shopify is that it’s a platform focused on growth and ease of use. It allows you to pretty much ensure that the e-commerce website works exactly as expected, and you don’t have to undergo a lot of steps to make this happen. If you do it right and follow these steps, then you can easily start customizing your site and generating sales.
Generally, these are the main steps:
- Create your Shopify account. Shopify offers a 14-day trial to help you getting started and to familiarize yourself with the platform. It’s fast, easy to do and it will take just a few minutes to set it all up.
- Choose a theme. After the initial setup, you can use their pre-installed, starter theme called Dawn or purchase one from their Theme Store (you’ll also be able to try the theme before you buy!). Once you have chosen the theme, you can begin customizing your store. We also have a guide to help you choose the theme.
- Customize your stores look & feel.With your new theme, you’ll be able to apply your brand’s identity by adding a logo, setting up colors, fonts and much more.
- Add your products to the catalog. When you add products, you need to add the product title, product description, but also photos and set up prices. You can set up variants of each product (different sizes, colors, etc.). It’s crucial that you double-check your work - the last thing you want is any error in the description, but also in the overall price.
- Add additional pages. Add additional content to your store like an About us page, contact us, FAQs and more. Your theme should already include many of these templates. It’s equally important that you include as much information about your brand and business as displaying the products that you want to sell. This helps establish trust with your customers which is necessary if you want customers to feel safe buying your products.
- Set up the payment processor. You can use their own payment processor or you can use third parties if you want, depending on your needs.
- Connect your domain.Once you’re ready to launch, all that’s left is to connect your domain name (the website address). Shopify makes it easy whether you already have a domain name or if you need to purchase one.
This is a basic overview of what’s needed to be done. But we’ve created a checklist for you to help take care of the crucial elements of building your online store.
Your store launch checklist:
- Insert the desired sales channels
- Choose your payment processor
- Choose your theme, customize your website and prepare pages
- Add your store policies
- Test your checkout flow system
- Integrate email automations
- Ensure that the email notifications are working
- Set up shipping options and rates
- Assess your content and perform an audit
- Provide an easy way for people to contact you
- Start using an analytics tool
- Prioritize your SEO (search engine optimization)
- Maintain a blog
- Optimize your images
- Set up taxes for your area
- Establish a marketing plan
- Install a minimum number of apps
- Add billing info
- Add a custom domain
1. Insert the desired sales channels
When you create a Shopify ecommerce website, it’s a important to add the right sales channels. You want to have as many sales channels as possible. Shopify offers easy integration with many like Facebook and Instagram, Google Shopping, TikTok, and Pinterest, but you can also integrate with Amazon, eBay, Etsy, and others using 3rd party apps.. If you create a sales channel on other platforms, you’re actually providing additional ways people can find and purchase your products. This way, you will create a wide net and generate quite a lot of growth and value. That’s why it’s well worth it to give this a shot, and the benefits can be second to none.
2. Choose your payment processor
Shopify offers over 100 payment providers/gateways to choose from yet also offer their own at better rates. You can also integrate with Paypal, Stripe, Authorize.net and others. And by the way, you also have an option to include “quick buy” methods like Apple Pay, Amazon Pay and others.
3. Choose your theme, customize your website and prepare pages
The last thing you want is for your website to look the same as the other sites out there. Using a theme will help differentiate your website from your competitors and push it to the next level. You could use their pre-installed, starter theme called Dawn or purchase one from their Theme Store. You also want to figure out a style and stick to it, since it will help your branding efforts. We also have a guide to help you choose the theme. Once you have chosen the theme, you can begin customizing your store.
Furthermore, the more content you add, the more information you include about your brand and your products will make it easier for your customers to make a decision and not think twice about your legitimacy. You want the visitors to your site to easily find the information that they’re looking for in order to make a purchase. Answer any of their common questions, describe who you are and your story and provide easy ways to get in touch with you.
Ideally, and at a minimum, your theme should have pages like an FAQ page, about us/our story, and contact us but there’s so much more you can add like a blog which will add so much value to your store. Keep in mind also that the more relevant content you add, the more likely people will find you organically via searches on search engines.
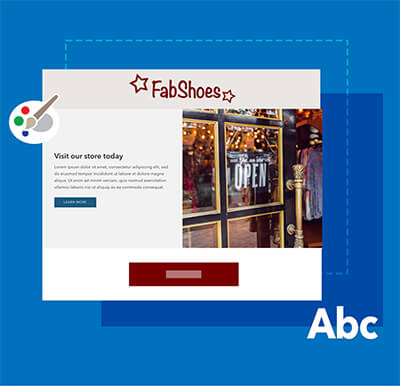
And if you’re looking for a specific way to display certain content on any given page and your theme doesn’t provide a way to do so, check out qwiqode.com. They offer a large variety of pre-built sections that you can easily install on your own and expand your themes capabilities.
Add a website section or a content block that perfectly fits your store and gives you the flexibility to customize it without hiring a developer to do it for you.

Aside from content pages, make sure you add functionality like displaying related products on a product page, product filters on collection pages, and products reviews – just to name a few. Adding multiple product categories is also important – the more detailed your collections are, the more likely (and the more easily) your visitors can find precisely what they’re looking for – and these collections may even give them ideas on what to buy.
4. Add your store policies
You also need to add pages explaining your stores return policy, shipping policy, privacy policy and terms of service. Shopify makes it easy for you by providing templates for your use. All of these matter to your customers. After all, if you place yourself in your customers shoes, they will always have some type of question and you want to address that as much as you can.
5. Test your checkout flow system
Since your Shopify website is here to make you money, focusing on payments is extremely important. What you need to keep in mind is to add all the payment systems you want and ensure that they all work. You can also see if the shopper is able to easily add to and edit their cart and that your discount codes are working as expected. In addition, check and see if the email notifications work. The more things you assess, the more you’ll be calm and confident that things will work correctly. With Shopify Payments you’ll be able to place test orders so that you’re not charging your own card.
6. Integrate email automations
You want to stay in touch with your customers. Ideally, you want to start using an email marketing app such as Klaviyo, Mailchimp or even Shopify Email. They can help you set up and send emails like abandoned cart notifications, welcome series, product sales or notify of new products added to your catalog. All of these can indeed make the experience better for customers, and results can be valuable by keeping your brand and your products top-of-mind with your customers.
7. Ensure that the email notifications are working
Be sure to test all of the email forms you have on your site as well as all of the notifications and confirmations sent from your store. Usually, you’d have a form on the contact page, a newsletter signup form and of course email confirmations are sent after making a purchase, including notifications regarding shipping status.
8. Set up shipping options and rates
Shopify makes it easy to integrate shipping with your store. You can easily integrate with USPS, UPS and DHL and add multiple mail classes with each carrier. You’ll also be able to add multiple warehouse locations and track inventory. But there are also many apps that help integrate your store with 3rd party shipping and fulfillment services.
9. Assess your content and perform an audit
When you create a Shopify website, web design is not the only thing you have to focus on. Your content is also very important, and it’s imperative to ensure that your content is the best that it can be. What we want you to focus on are things like checking for any grammar, spelling or other mistakes so conduct a final read-through of everything. Another thing to do here is to check and see if there are broken links (links that lead to incorrect pages or pages that aren’t available or don’t exist) on your website and within your content.
10. Provide an easy way for people to contact you
A contact page is crucial because it makes it simple for customers to get in touch. You can also go the extra mile and add a chat system. It’s possible to use a chatbot so customers receive some information from your knowledge base, and then get in touch with a real person. Live chats are great and very appealing for customers, since they know they can get immediate support in no time. Shopify offers a free, though quit basic, chat bot but it does the job – at least in the beginning.
But aside from that, make sure you have a contact page with a form and your address and phone number so people can reach out if needed.
11. Start using an analytics tool
The reason you want to have an analytics tool is because it gives a ton of insight when it comes to your business as a whole. You’ll be able to see where visitors are coming from, which pages they are visiting, how long they are there and much, much more. Shopify has its own analytics tool which provides a lot of useful information regarding your store, but you should also use the Google Search Console and Google Analytics. Shopify gives you an easy way to connect your site with your Google Analytics account. After you setup an account on Google, you can paste the account ID in the Shopify settings and you’re ready to go.
12. Prioritize your SEO (search engine optimization)
SEO is important if you want your website to be easily found in search. A good idea is to perform keyword research and see what keywords are suitable for your website. Shopify automatically creates a sitemap for you but you need to notify Google via the Search Console. And you should also make your theme includes a schema markup so that Google and other search engines can index your site most efficiently.
When it comes to keyword optimization, you want to add the keywords in image file names, meta titles like page title and description, product and category description, add “ALT tags” to all of your images, as well as many other similar places. Shopify makes it easy to add most of these elements directly in the site admin. Read more about SEO guidelines here.
Another recommendation is to optimize the site speed. This will make the experience of viewing your website a whole lot better and more convenient too. Your site will load fast and not frustrate your users as most people don’t tend to wait for more than a few seconds for a page to load. These are only a few of the many things you can do to optimize for SEO.
13. Maintain a blog
Another thing you can focus on is to create great content. The idea here is to have a blog section for your Shopify website. Here you can start posting content often and that will help come in handy. You can easily boost conversion rates, and you will also generate traffic from Google or other search engines.
Another advantage here is the fact that you can also receive backlinks, something that can become extremely important. The more you focus on creating great content for your audience, the better the results will be. That’s the thing, you don’t want to overly optimize for search engines, the content still needs to sound natural and professional. Which is exactly what makes it such a great idea to have lots of blog posts, since they assist with branding, while also offering help to those that need it.
14. Optimize your images
Ideally, you want to reduce the size of your images to improve site speed, and rely on JPEG or WEBP file formats for most images, with PNG being a great format for icons and graphics or any image that needs a transparent background. In addition, add keywords to the Alt tags and descriptions, because they can make it easier to rank images too. A/B tests for images are also handy, since they can help you figure out if the images work the way you want or if they need any replacements.
You can read more about how to optimize your images here.
15. Set up taxes for your area
You should check that the tax settings are appropriate for the products that you’re selling but Shopify makes it easy to charge sales tax. If you’re based in the US, there are many complexities due to different sales tax rules for each state so you should check carefully what you need to charge, if anything.
16. Establish a marketing plan
You want to ensure that you get your own pre-launch marketing plan in order. This means you need to figure out how much you want to spend on ads, where you will place ads, what other types of marketing you want to do and so on. The main focus is to diversify your marketing and use a multitude of marketing systems the way you want.
17. Install a minimum number of apps
You want to avoid installing too many apps and only install essential ones. Browse the Theme Store, create a list with the apps that will bring value to your website and then narrow them down to just a few.
Too many apps could cause confusion with too much functionality on the site, and it will also slow your site down - sometimes even considerably. It’s a balancing act between using apps that could increase your sales and the speed and complexity of your site in order to keeping the visitor engaged and having an enjoyable experience. Plus, most apps have a monthly cost and you don’t want to get overwhelmed with a high monthly cost – especially in the beginning. There are lots of apps you can use for a variety of functions, so just check the store and see what works for you.
18. Add billing info
This is an important step because you don’t want to have issues when the store goes live. When your free trial is coming to an end, you want to make sure you’ve entered your billing information so Shopify can begin charging you and that your site doesn’t go offline.
19. Add a custom domain
There are many reasons why you want to have a custom domain. One of the best benefits is that it allows you to boost brand recognition naturally. The thing to note here is that you want to figure out a brand name that has a domain that is available and which is not trademarked. Even if this will take a little bit of time, it’s a crucial aspect because it will help you grow and expand your business. So you always need to take time when you narrow down a good brand name. You can also have a .shop or .store top level domain (among many others), not just .com.
Conclusion
Once you use this checklist, it becomes a lot easier to ensure that your website is good to go and ready to be live. There are always challenges when it comes to setting up a great Shopify website, but these steps will make things easy and convenient. It’s going to be well worth it if you go through the checklist, because you can identify problems and solve them before the Shopify website goes live!
And if you need help, please don’t hesitate to reach out to Studio Umbrella (the owners of qwiqode.com) - we’ll be happy to help.